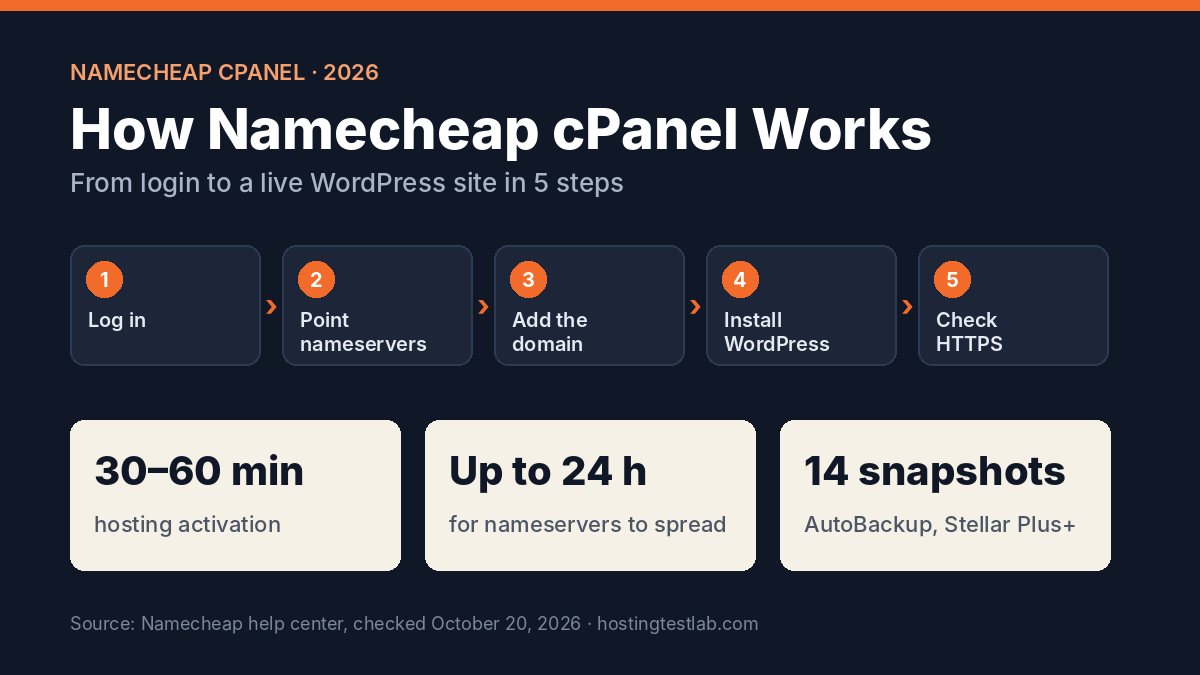
Namecheap cPanel is the control panel that comes with Namecheap’s Stellar shared hosting plans. It is where you add domains, install WordPress, set up email and restore backups. To open it, sign in to your Namecheap account, choose Hosting List in the left menu and click Go to cPanel next to your main domain. Adding a site then takes two steps: create the domain under Domains, then install WordPress with Softaculous.
The steps and limits below were checked on October 20, 2026 in Namecheap’s help center articles on cPanel login, addon domains, Softaculous, Namecheap SSL, AutoBackup and cPanel backups. Plan prices were checked on October 19, 2026 on Namecheap’s US hosting page.
Before you start: what your plan allows
After you order, Namecheap says shared hosting becomes active within 30 to 60 minutes. Your cPanel login arrives in an email titled “Your Hosting Account Details,” sent to the address on your billing profile, so check the spam folder if it is missing. What you can do in cPanel then depends on the plan:
| Plan | Websites | AutoBackup in cPanel | Price, 2-year term |
|---|---|---|---|
| Stellar | 3 | No | $1.88/mo ($45.12) |
| Stellar Plus | Unlimited | Yes | $2.28/mo ($54.72) |
| Stellar Business | Unlimited | Yes | $4.48/mo ($107.52) |
On Stellar, your main domain counts as one of the 3 websites, so you can add 2 more in cPanel before you need an upgrade. Stellar Plus is $9.60 more for the two-year term and removes that cap. Our Namecheap hosting review covers renewal prices and file limits for all three plans.
Step 1: Log in to Namecheap cPanel
Namecheap’s help center lists three ways in:
- From your Namecheap account (easiest): sign in, select Hosting List in the left menu, find your main domain and click Go to cPanel.
- From cPanel Shortcuts: click Manage next to the hosting plan. The Software section has shortcuts that open single tools, such as Files, Email and WordPress. Namecheap says this option is for shared hosting only.
- From a direct address: go to yourdomain.com/cpanel, or to your server name on port 2083, using the server name and login from the welcome email.
If your domain does not point to Namecheap yet, the first and third options with the server name still work. If you paste the login from the email, remove any extra spaces, as Namecheap’s own article advises.
Step 2: Point the domain to your hosting
cPanel will not add a domain until it points to Namecheap’s hosting. For shared hosting, Namecheap lists the nameservers as dns1.namecheaphosting.com and dns2.namecheaphosting.com. If the domain is registered at Namecheap, change them in the domain’s settings in your account. If it is registered elsewhere, change them at that registrar.
Warning: Namecheap notes that your existing DNS records are not copied into cPanel when you switch nameservers, and that this can take a working website or email offline. If the domain already has email or another service, write down its DNS records first and add them again in cPanel.
If you cannot change the nameservers, for example because you use PremiumDNS or another DNS provider, Namecheap offers domain control validation instead: a DNS TXT record, an HTTP file or an HTML method. The validation code is valid for one day, so finish the step the same day you start it.
Step 3: Add the domain in cPanel
- In cPanel, open Domains in the Domains section.
- Click Create A New Domain.
- Type the domain. The Subdomain field fills in by itself.
- Click Submit.
If cPanel shows an error, the domain usually does not point to Namecheap’s nameservers yet, or it already exists in the same account as an addon or main domain. Namecheap says nameserver changes can take up to 24 hours to spread, and that the wait cannot be sped up. Our full guide on how to add a domain in cPanel walks through every field with screenshots, including the document root setting.
I run my own sites on Namecheap shared hosting, and each new site starts here: add the domain in cPanel, then install WordPress with the one-click installer. I find the panel and the file layout easy to follow.
Step 4: Install WordPress with Softaculous
- In cPanel, open the Exclusive for Namecheap Customers section and click Softaculous Apps Installer.
- Click Install under WordPress.
- In Choose the domain, pick the domain you just added.
- Leave In Directory empty. That installs WordPress on yourdomain.com itself. Typing a folder name such as blog puts it at yourdomain.com/blog instead.
- Change the table prefix from the default wp_ to something of your own. Namecheap recommends this for security.
- Set an admin username and password that are hard to guess, not “admin”.
- Click Install, wait for the success message, then log in to the WordPress dashboard.
The In Directory field is the one to double-check. Namecheap warns that a wrong value puts WordPress in the wrong place: a leftover folder name sends visitors to an empty home page while WordPress sits one folder deeper. Moving an existing site instead of starting fresh? Our guide on how to move a WordPress site to a new host covers that path.
Step 5: Check that HTTPS works
The Namecheap SSL plugin sits in the same Exclusive for Namecheap Customers section. According to Namecheap, the free SSL that comes with a shared plan installs itself on new addon domains and subdomains once the domain points to the server, and it turns on the HTTPS redirect. Namecheap says this takes up to 30 minutes.
If the certificate stays “In progress,” the domain is not pointing to the server yet. Fix the nameservers or DNS records first, then click Install in the Ready for installation tab, which Namecheap says takes about 25 minutes.
Step 6: Set up email and backups
Email: create mailboxes for the new domain in cPanel’s Email section. Stellar includes 30 mailboxes, and Stellar Plus and Stellar Business include unlimited mailboxes. cPanel email is capped at 10 GB on shared hosting accounts, and you can use either cPanel email or Namecheap Private Email on a domain, not both. Our guide to Namecheap email hosting compares the two.
Backups: on Stellar Plus and Stellar Business, AutoBackup sits in the Exclusive for Namecheap Customers section. Namecheap says it keeps up to 14 snapshots (six daily, three weekly and five monthly) covering about six months. You can restore the full account, single files or folders, or a single database. For a full restore, pick the Basic option if you want to keep content added after the backup date; the Advanced option rebuilds the account exactly as it was on that date. Select PHP Version sits in the same section, and our guide to updating your WordPress PHP version shows which version to pick.
The Stellar plan does not include AutoBackup. You can still make your own full backup in cPanel under Files, then Backup, and Namecheap recommends doing that before any big change. But Namecheap’s backup article says Stellar cannot restore a full backup, including cPanel settings, by itself: you have to email Namecheap’s support team. You can restore a home directory backup yourself, as long as it was made with the Download a Home Directory Backup option. That difference makes Stellar Plus the safer plan if you will keep more than one site in the same cPanel account.
Which Namecheap plan to choose for cPanel
- One to three small sites: Stellar, $45.12 for two years, if you are fine with making your own backups and asking support for a full restore.
- Several sites, or any site you cannot afford to lose: Stellar Plus, $54.72 for two years, with unlimited sites and AutoBackup restores from cPanel.
- Busy sites or many files: Stellar Business, $107.52 for two years.
If you plan to run many sites, our guide to the best hosting for multiple websites compares Namecheap’s cost per site with three other hosts. If Namecheap no longer fits, our list of Namecheap alternatives shows when switching pays off.
Namecheap cPanel FAQ
Where do I find my Namecheap cPanel username and password?
In the welcome email titled “Your Hosting Account Details.” If you lost it, you can still open cPanel with the Go to cPanel button in your Namecheap account, then change the password under Password and Security.
Can I use cPanel before my domain points to Namecheap?
Yes. Go to cPanel in your account and the server address from the welcome email both work right away. Only the yourdomain.com/cpanel address and new website traffic wait for the nameserver change.
How many domains can I add in Namecheap cPanel?
Namecheap’s addon domain article says its hosting plans let you host multiple domains but gives no number. The plan sets the limit: 3 websites on Stellar, unlimited on Stellar Plus and Stellar Business.